Using a DSLR or a high-end point and shoot camera leaves you with many benefits and options for creativity when going out for a shooting session. As you’re out and about searching for or come about a great photo opportunity you are in total control of how you want your photo to turn out. Your knowledge and experience are the only factors limiting your ability to perceive a photo and transfer that perception into a finished photograph. When speaking of knowledge and experience, proper camera settings are a learned skill and barrier for your desired photos. Shutter speed, focal point, focus point, ISO, exposure levels, lighting, focus mode, positioning, depth of field, and white balance are examples of most of the camera settings that one must take into consideration in order to bring out the creativity within themselves. Sounds like a complex and lengthy process, but with practice and gained experience it becomes second nature.
Every photographer edits their work; either they may have made slight misjudgments of some camera settings, they may want to enhance their photos in a way that their camera cannot, or they may want to alter their photos in other ways. Some general and popular editing adjustments are exposure, brightness, contrast, saturation, and hue that can be made to the photo as a whole. This is a simple alteration that can be made, but then there are adjustments that can be made to specific areas of your photo that can make a big difference and require more skill and knowledge on photo editing software.
Here are some examples of some adjustments I have made to photographs that I snapped myself. Each photo was taken with a Nikon D60 with a Nikkor AF-S 55-200mm VR lens. Editing was done using Adobe Lightroom 3. The photographs on the top are originals, and photographs on the bottom are edited.
 |
| ISO 1600 24mm f/4.2 1/6sec |

The photo was taken at Nuit Blanche; my friend in the middle of thick smog. I decided to turn the photo Black and White in order to intensify the dark and creepy mood of the photograph. The background has been darkened, lighting has been brightened, and I readjusted the clarity and noise levels which resulted in the softening of the fog.
 |
| ISO 100 55mm f/4.0 1/30sec |
This was taken in the Eaton's Center at a Blue Jays merchandising store; the subject being two bejeweled caps. The editing undergone with this photograph was slightly more complex. To start off with the basic settings I adjusted the contrast, exposure, brightness, clarity, and sharpness in order to enhance the colors of the photo and make it more visually appealing using a Graduated Filter. Secondly I specifically chose to work on the bejeweled blue jays symbols on the hats to bring the focus of the picture on that particular part. Using the Adjustment Brush I outlined the blue jays symbols and individually edited them by increasing the brightness and exposure levels, as well as the contrast and clarity levels.
 |
| ISO 200 55mm f/4.0 1/50sec |
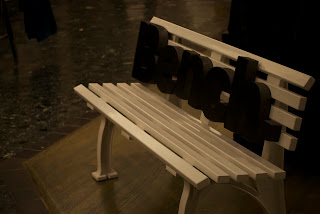
This photo was taken in the Eaton's Center at a Bench display. As an example, this photo did not turn out as I hoped it would. I set my shutter speed to high in order to work with the indoor lighting conditions. Using some simple editing I was able to enhance the photo as I originally hoped it would of turned out. I decreased the temperature and increased the tint of the photo in order to deepen the colors in the photo. Exposure and brightness have been increased as long as the fill light. The texture has been sharpened to increase the quality of the photo.


No comments:
Post a Comment